Elephants have been living with bees for a very long time so it is not a surprise that they have a method of warning their herd when a swarm of bees are close.
Elephants are afraid of bees because the bees attack them by stinging around their eyes and even in their trunks. Young elephants do not have as thick of skin and as a result can be stung to death by a swarm of bees. We are also talking about Kenya, home of the aggressive "Killer Bees".
Farmers will be able to use the warning call as an audio clip to deter elephants from eatting their crops.
See the link for more information and an interesting video:
Elephants make alarm call to warn of approaching bees

Tuesday, April 27, 2010
Thursday, April 22, 2010
Happy Earth Day!
Do something for the planet... keep bees. Or plant bee-friendly plants around your property to support native bee and other pollinator populations.
Today I did an inspection on the single box hives located at my parents farm. These are my observations:
The Blue Hive:
This hive is only covering 5 frames at most. This is a bit concerning because I am feeding them a pollen patty and extra sugar and they seem to have a slow build up. Upon further investigation; I noticed that the brood pattern is pretty spotty. This means that the queen may not be laying very well. My records show that she is a queen from mid summer. She should be well bred and I bought her from a reputable breeder. The workers have not built any supercedure cells; so that means that they still have faith in her!
 As a precaution I treated both hives with oxycet-25 which is an antibiotic Terramycin which is mixed with powered sugar and sprinkled on the top bars. This prevents American Foulbrood (which if you ever get; requires you to burn the entire hive).
 As you can see, the powder is sprinkled on the top bars. The hive also had an indication of Chalkbrood disease which shows up in a damp spring. There is no treatment for it and the bees quickly get rid of it when their hive has more ventilation. I am not too worried about Chalkbrood.
The White hive:
This hive was a swarm capture from late summer and it is doing amazing. They cover all of the frames and they have a very good brood pattern. I have no history on these bees. I do not even know what breed they are. I have a feeling that they may be Italians. They have a very strong spring build up. Because of their limited space and the age of their queen (unknown but likely older than one year because the old queens swarm). They have build two supercedure cups in the top third of a frame. This means that one of these potential queens will replace the current old queen. But I have other plans for her and cut out the cells. I also found a potential swarm cell on the bottom of the frame; which I also cut out.
 Those cells are prefect spheres and are built offset from the rest of the cells. These particular ones are in early stages and did not have any eggs in them. If they would have eggs in them, the bees would feed them royal jelly so that they grow to be queens. As the queens grow, the workers would shape the cell to look peanut shell-like. The first queen to emerge would go around the hive and break all the other cells and sting the other queens to death; yeah, its' a harsh world.
 Here is a picture of my queen as she scoots across some of her beautifully capped brood. Look at the size of that queen and her darker color!
I did all of my hive inspections without gloves. It was pretty liberating. It forces you to work more fluidly and for you to be a lot more careful. I must have done it right because I did not get a single sting and I did not even use much smoke.
Today I did an inspection on the single box hives located at my parents farm. These are my observations:
The Blue Hive:
This hive is only covering 5 frames at most. This is a bit concerning because I am feeding them a pollen patty and extra sugar and they seem to have a slow build up. Upon further investigation; I noticed that the brood pattern is pretty spotty. This means that the queen may not be laying very well. My records show that she is a queen from mid summer. She should be well bred and I bought her from a reputable breeder. The workers have not built any supercedure cells; so that means that they still have faith in her!


The White hive:
This hive was a swarm capture from late summer and it is doing amazing. They cover all of the frames and they have a very good brood pattern. I have no history on these bees. I do not even know what breed they are. I have a feeling that they may be Italians. They have a very strong spring build up. Because of their limited space and the age of their queen (unknown but likely older than one year because the old queens swarm). They have build two supercedure cups in the top third of a frame. This means that one of these potential queens will replace the current old queen. But I have other plans for her and cut out the cells. I also found a potential swarm cell on the bottom of the frame; which I also cut out.


I did all of my hive inspections without gloves. It was pretty liberating. It forces you to work more fluidly and for you to be a lot more careful. I must have done it right because I did not get a single sting and I did not even use much smoke.
Tuesday, April 20, 2010
To treat or not?
Integrated Pest Management(IPM) is a principal that the Ontario Beekeepers Association(OBA) is really pushing as an economical and the healthiest way to manage bees in Ontario. It involves monitoring levels of various ailments in the hive and determining if those levels have reached the economic thresholds. When the economic threshold is reached, there is a treatment available but of course this is at a cost to the beekeeper (for the chemical treatment and "downtime" of the colony).
An example of this is my current formic acid treatment for my Varroa Mite infestation. I monitored the mite drop over several days and I physically saw that their was mites in the uncapped brood. The economic threshold was reached and the hive require an intervention. I choose to use Mite Away II (formic acid pad) because I have some on hand and it is a soft chemical treatment (formic acid is found in nature). I also chose Mite Away II because it is a 3 week treatment.
The purpose of this post is that I am questioning if I should treat for prevention of Nosema and foulbrood. I treated for these in the fall of last year without there actually being any symptoms. There still are no symptoms of these diseases in my hives and I am thinking of not treating for them. The more you treat for diseases, the more that the diseases develop resistance to the drugs.

Hang on!
Saturday, April 17, 2010
Snow?!?
Today there was some snow on the ground when I woke up and there was also some ice snow flurries throughout the morning. There was a brief stop in the wind gusts and the sun came out. I thought it would be nice to put up some photos of what spring should look like. These are some of the flowering and soon to be flowering plants around the yard.

 I am not really sure what type of plants some of them are.
 Some of my apple trees are ready to bloom. This will be a small source for the bees being that there are only a dozen apple and prune trees.
My formic acid treatment is not ideal for this range of temperature but it is not too big of a deal. The forecast for next week is perfect for the formic acid treatment. They are calling for a range of 8-12 C throughout the day.


My formic acid treatment is not ideal for this range of temperature but it is not too big of a deal. The forecast for next week is perfect for the formic acid treatment. They are calling for a range of 8-12 C throughout the day.
Thursday, April 15, 2010
Formic Acid pads on!
Today I followed through with my instincts and treated both of my full hives which are located at my house. I did a quick inspection for both hives and then put my spacer piece and my Mite Away II formic acid pads on top of both brood chambers. I closed the top of the hive so that air does not flow freely. I also completely opened the front of the hive. All of those things are per the instructions.
When going through the green hive, which was by yesterdays count; the most heavily infected, I found a frame which I had forgotten about. For some reason the bees built this comb as one sided with a bee space behind. You probably should take a better look at the picture bellow to understand. Anyways, since the bees decided what size of cell that they wanted, they made it in drone cell. Which may be a source of all those mites. The mites love/prefer drone cells because they have more room. This is a ton a drones! This is a pretty good indication that the hive is vigorous. They do not start to raise drones until they are comfortable with their stores; I hope this does not mean that they plan on swarming.
 I took the opportunity to rip out all of the drone brood on this frame. This will automatically kill a lot of mites. Drones do not do anything but eat honey and breed queens; and I do not want either of those two things happening yet! I will have to see if they start putting comb on this frame properly. I may have to try to re-coat it with wax. The other side had young brood in it so I left it.
 The formic acid pads will be removed on May 6th. They sit on the hive for 3 weeks. I tossed the spent wax in the field. You should always throw out wax far way from your hives so you do not encourage pests to seek out your hives.
When going through the green hive, which was by yesterdays count; the most heavily infected, I found a frame which I had forgotten about. For some reason the bees built this comb as one sided with a bee space behind. You probably should take a better look at the picture bellow to understand. Anyways, since the bees decided what size of cell that they wanted, they made it in drone cell. Which may be a source of all those mites. The mites love/prefer drone cells because they have more room. This is a ton a drones! This is a pretty good indication that the hive is vigorous. They do not start to raise drones until they are comfortable with their stores; I hope this does not mean that they plan on swarming.


Wednesday, April 14, 2010
Varroa Mite Count : 48 hrs later

The trays were retrieved 48 hours after they were put in. As you can see a bunch of debris fell through my mesh floor and landed on my sticky wax paper. Note: the left tray is turned around the wrong way!


The Green hive: had a whooping 90 mites in 48 hours. Which makes a 24 hour count of 45. This is not good. It means that I will have to treat and I was planning on actually making a partial split of the hive.
The White hive: had only 10 mites in 48 hours. Which is actually really good but I think it is wrong. Well, the count is correct but I had reversed the boxes on April 5th; so the brood is primarily in the top chamber and the mites would be dropping down into the bottom box and would likely reattach themselves to passing bees at a much higher rate. I am likely going to start treating as soon as possible.
Monday, April 12, 2010
Varroa Mite Count
Integrated Pest Management (IPM) is an important part of keeping bees healthy and minimizing treatments.
Tonight I popped off my landing boards and pulled out the plywood tray to clean off. Take a look at what was on that tray!
 This shows everything that has fallen down the screen. Take a look at all that good pollen! I threw all of this into the field nearby. It is good practice to always discard of comb and other bee products far enough away from the hive so that you do not attract skunks or other pests.
 There was also a lot of mites on the bottom board. They are those shiny little football shaped critters. I think that my removable tray is so far away from the bottom board that the mites are unable to make it back in the brood nest. As you can see; bottom trays act as a passive mite "treatment".
 This is what the hive looks like with the sticky paper in place and the landing board off. I will take the paper out in 2 days and do a mite count to see to what degree my colony is affected. Until then...
Tonight I popped off my landing boards and pulled out the plywood tray to clean off. Take a look at what was on that tray!


Wednesday, April 7, 2010
Local Beekeeper
On my way home the other day I stopped at a bee yard in which I saw a beekeeper working. I drive by these hives every day and I have seen the beekeeper there a couple of times but never had the courage to stop in.
He was busy treating for mites and giving the hives some pollen patties. I typically treat hives for mites with Mite-Away II. It is a formic acid pad which releases formic acid and essentially fumigates the bees to kill off all of the mites. I personally think that it causes a lot of damage to the bees. I think it mostly works by breaking the brood cycle and therefore breaking the mite breeding cycle and it also does kill mites by fumigation. He was treating them with small formic acid pads which he has to replace every 4 days. He claims that the big ones (which I use) are too strong for weaker hives; he also claims that the bees essentially just stop working while those bigger pads are in; which makes them less prepared for the honey flow. He had lots of excellent points.
The most interesting thing about this beekeeper was that he has five hundred hives located throughout thirty three yards. That is just mind boggling to me. I had previously realized that the only way you can make a living with honey was to have 500+ hives. This man also does it all on his own and he said that he is sixty. Last year he had 30% losses in the spring and this year it is somewhere close to 10%. I think this has a lot to do with our gentle winter but it is really hard to know exactly.
It was nice to meet a fellow local beekeeper. I am still not part of any club or anything and I really only find out about beekeeping through what I read.
Blue Hive Checked
Tonight I quickly took a look at my blue hive which I put some 1:1 sugar water in a hive top feeder and a half a pollen patty under the hive top feeder. They still do not seem to be taking in a lot of the sugar water. They are slowly working at the pollen patty.
 This does show that the hive is kind of weak. I am thinking that I may want to take some frames of brood and some bees from my stronger two hives (which seem to be congested) and donate them to this hive to try to get their numbers up.
 As for now, enjoy the pictures. I wonder how they carry around this fake pollen.


Monday, April 5, 2010
Clover field planted... in the dark
Tonight I took the opportunity to open up the two double box hives that I have at home. I knew that they were strong but I was surprised at how strong they actually are. The green hive was opened first and to my surprise, they still have a lot of their honey remaining and several frames of pollen. It is pretty incredible to see some full frames of pollen this early in the year; there were also some very young eggs in this top box. I lifted off the top box and it was quite heavy. I checked the bottom box and it was equally full of pollen and honey.
 When separating the boxes some developing pupae were exposed. These are likely drone cells which are built between the cells. They are more susceptible to mite infestations and a good indication as to mite infestation. This calls for a mite drop count to see if I should treat. I did see some drone bees out already.
The white hive had a lot of honey in the top box but not as much pollen as the green hive. I lifted the top box off and took a look at the bottom box. It has a lot of pollen and a lot of room for eggs in the bottom. I did find some very young eggs in the bottom box. The box was quite a bit lighter so I decided to change the bottom box with the top box. The bees like to store their honey higher up in the hive, so this will allow them to use their stored honey to build up their hives and this also gives them room to store honey in the now emptier box.
I checked the week forecast and I saw that they are calling for rain for the rest of the week. So I called my dad and we decided to try to seed the yellow clover in the dark. Here is a picture of what the seed actually looks like:
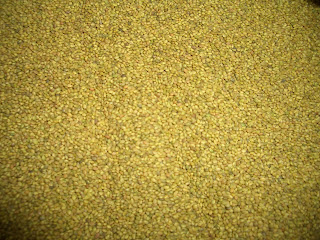 The smell of the seeds was quite sweet, hence the name. We had some issues with the seeder. We used a battery powered seeder mounted to the back of an ATV. We then packed the field down. Time will only tell if the seeds were spread properly.

The white hive had a lot of honey in the top box but not as much pollen as the green hive. I lifted the top box off and took a look at the bottom box. It has a lot of pollen and a lot of room for eggs in the bottom. I did find some very young eggs in the bottom box. The box was quite a bit lighter so I decided to change the bottom box with the top box. The bees like to store their honey higher up in the hive, so this will allow them to use their stored honey to build up their hives and this also gives them room to store honey in the now emptier box.
I checked the week forecast and I saw that they are calling for rain for the rest of the week. So I called my dad and we decided to try to seed the yellow clover in the dark. Here is a picture of what the seed actually looks like:

Sunday, April 4, 2010
Mead: Homestretch
I finally got around to transferring my mead off the spent yeast and they are in their last carboys. They have not been bubbling much in the last little while, but it has been sealed. So it is like being in a bottle. I hope to bottle it in three or four months.
 As you can see; I have to add marbles to avoid a large air cavity. I am really liking the left one which is only water and my honey.

Friday, April 2, 2010
New home for the single boxed hives
Last night I blocked the entrances for the single box hive so that they could not get out come morning time. This morning at 7 I loaded up the hives and drove down to my parents farm to put them to their new temporary home. This year I am facing the hives due south. I think it should work out great. The location is ideal for many reasons; very close to a deep pond (for water), bellow some mature maple trees which provide shade during the hottest parts of the day, they near an earth mound which will reduce the prevailing winds and they are easily accessible to me.

I took a look under the cover of the white box and the bees seem to be very congested. I think I am going to add an empty box with empty comb in it for them to keep busy. I do not need them to start swarming on me.
 During the day there was a lot more activity at the white hive. They are definitely the stronger of the two. The blue hive will need some feeding to help it build up. I want the hives to be at their strongest come time for the flow; but I also want them to be healthy.
 I finished off the day by discing the plowed field. I am preparing it for the clover seed. I am going to need a nice day or two of drying before I can start seeding it. It sure does look good though. I cannot wait to have it planted. I plan on bringing back the above bees for when the clover blooms.

I took a look under the cover of the white box and the bees seem to be very congested. I think I am going to add an empty box with empty comb in it for them to keep busy. I do not need them to start swarming on me.


Thursday, April 1, 2010
Clover Field Plowing
Last night my dad showed me exactly how to plow a field. We are borrowing a small plow from an uncle and we have it on our small loader tractor. My dad is used to plowing with a 6 or 7 furrow; but this small one is a 3 furrow (even easier to use). Like I had said earlier, there is a pasture beside my beehives which is not really used and it has old grasses in it so I am plowing one of the available four acres to put clover in it. We are squaring up the awkward angle part of the pasture.

Here is a picture of the single hives which are side by side and they no longer have the insulation around them. They look a bit odd. As you can see there is a lot of activity. Today after work, I went to my parents farm and cleaned their new home up by cutting off some dead branches which will be above their hives. Last thing I need is a dead branch breaking off and destroying my hives. I plan on moving them early in the morning. The location is roughly 7 kms as the crow flies. This is a perfect distance; for the bees will not make their way back to their original location.
 This shows the hustle and bustle of my two larger hives. They too were taking advantage of the nice weather and collecting lots of pollen and water.
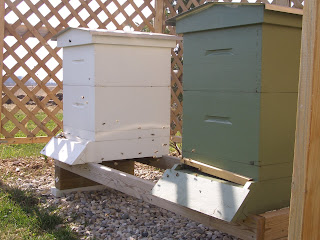

Here is a picture of the single hives which are side by side and they no longer have the insulation around them. They look a bit odd. As you can see there is a lot of activity. Today after work, I went to my parents farm and cleaned their new home up by cutting off some dead branches which will be above their hives. Last thing I need is a dead branch breaking off and destroying my hives. I plan on moving them early in the morning. The location is roughly 7 kms as the crow flies. This is a perfect distance; for the bees will not make their way back to their original location.


Subscribe to:
Posts (Atom)